DependencyServiceを属性を使って注入する[Xamarin.Forms]
タイトル通りのはずです。意味がわからないですけどできたので備忘録代わりに。
なぜしようと思ったのか
の記事を見てこういう機能は面白そうだなーと思いました。(Get
そして以前JavaのWebフレームワークである「Spring Boot」というのを(ほんの軽く)触って、属性(アノテーション?)を使ってXMLとか特に書かずにルーティングなどができるのは素晴らしい!と思いました。(特に大学の講義でServletをやって、web.xmlを手書きしていたため)
そのSpring Bootの機能の1つにAutoWiredというのがあります。これをクラスのフィールドにつけると勝手に依存性を注入してくれます。
この2つの発想を合わせてみました。
ソースコード
試したのはXamarin.Forms2.0(VSのプロジェクトテンプレートそのまま)です。 最初は属性クラスです。
using System;

namespace XamarinSample
{
    [AttributeUsage(AttributeTargets.Field|AttributeTargets.Property|AttributeTargets.Parameter)]
    public class AutoWiredAttribute:Attribute
    {
    }
}
ひとまず目印になってほしいだけなので中身空っぽです。あと名前はSpringBootのパクリです。
次にこの属性を見つけてDependencyServiceを注入するクラスです。
using System.Linq;
using System.Reflection;
using Xamarin.Forms;

namespace XamarinSample
{
    public class DependencyServiceInjection
    {
        public static void Inject(object source)
        {
            //DependencyService.Get<T>()メソッドの情報クラス
            var dependencyService = typeof(DependencyService).GetRuntimeMethod("Get",
                new[] {typeof(DependencyFetchTarget)});

            //sourceオブジェクトのフィールドにAutoWired属性がついてるFieldInfoコレクション
            var field =
                source.GetType().GetRuntimeFields().Where(x => x.GetCustomAttribute<AutoWiredAttribute>() != null);

            //sourceオブジェクトのプロパティに(ry
            var prop =
                source.GetType().GetRuntimeProperties().Where(x => x.GetCustomAttribute<AutoWiredAttribute>() != null);

            foreach (var fieldInfo in field)
            {
                //DependensyService.Getに型引数をつけてInvoke
                var instance = dependencyService.MakeGenericMethod(fieldInfo.FieldType)
                    .Invoke(typeof(DependencyService), new object[] {DependencyFetchTarget.GlobalInstance});

                //フィールドに代入
                fieldInfo.SetValue(source, instance);
            }

            foreach (var propertyInfo in prop)
            {
                //Fieldのプロパティバージョン
                var instance = dependencyService.MakeGenericMethod(propertyInfo.PropertyType)
                    .Invoke(typeof(DependencyService), new object[] {DependencyFetchTarget.GlobalInstance});

                propertyInfo.SetValue(source, instance);
            }
        }
    }
}
見て分かる通りリフレクション使いまくりです。
あとはこれをコンストラクタなどで呼び出せば勝手に注入してくれます。
では実際に使ってみたいと思います。
namespace XamarinSample
{
    public interface ISample
    {
        string Get(string text);
    }
}
namespace XamarinSample
{
    public interface ISample2
    {
        string GetPath();
    }
}
めっちゃ適当です。。。
今回はXamarin.Forms側に2つのInterfaceを用意してみました。
これらの各プラットフォーム毎の実装が以下になります。
iOS
using Xamarin.Forms;
using XamarinSample.iOS;

[assembly:Dependency(typeof(Sample))]
namespace XamarinSample.iOS
{
    public class Sample:ISample
    {
        public string Get(string text)
        {
            return text + "Platform on iOS.";
        }
    }
}
using System;
using Xamarin.Forms;
using XamarinSample.iOS;

[assembly:Dependency(typeof(Sample2))]
namespace XamarinSample.iOS
{
    public class Sample2:ISample2
    {
        public string GetPath()
        {
            return Environment.CurrentDirectory;
        }
    }
}
Android
iOSとほぼおなじ。
UWP
using Xamarin.Forms;
using XamarinSample.UWP;

[assembly:Dependency(typeof(Sample))]
namespace XamarinSample.UWP
{
    public class Sample:ISample
    {
        public string Get(string text)
        {
            return text+"Platform on UWP.";
        }
    }
}
using System.IO;
using Xamarin.Forms;
using XamarinSample.UWP;

[assembly:Dependency(typeof(Sample2))]
namespace XamarinSample.UWP
{
    public class Sample2:ISample2
    {
        public string GetPath()
        {
            return Directory.GetCurrentDirectory();
        }
    }
}
雑ですがこれでDependencyService部分ができたのでXamarin.Formsに戻ってViewとViewModelを作っていきます。
namespace XamarinSample
{
    public class SampleViewModel
    {
        [AutoWired] private ISample sample;
        public string Text { get; private set; }

        [AutoWired]
        public ISample2 Sample2 { get; set; }

        public string Path { get; set; }

        public SampleViewModel()
        {
            DependencyServiceInjection.Inject(this);
            Text = sample.Get("Hello Xamarin!");
            Path = Sample2.GetPath();
        }
    }
}
<?xml version="1.0" encoding="utf-8" ?>
<ContentPage xmlns="http://xamarin.com/schemas/2014/forms"
             xmlns:x="http://schemas.microsoft.com/winfx/2009/xaml"
             xmlns:xamarinSample="clr-namespace:XamarinSample;assembly=XamarinSample"
             x:Class="XamarinSample.SampleView">
  <ContentPage.BindingContext>
    <xamarinSample:SampleViewModel />
  </ContentPage.BindingContext>
  <StackLayout Orientation="Vertical">
  <Label Text="{Binding Text}" VerticalOptions="Center" HorizontalOptions="Center" />
    <Label Text="{Binding Path}" VerticalOptions="Center" HorizontalOptions="Center" />
    </StackLayout>
</ContentPage>
これで完成です。
実行
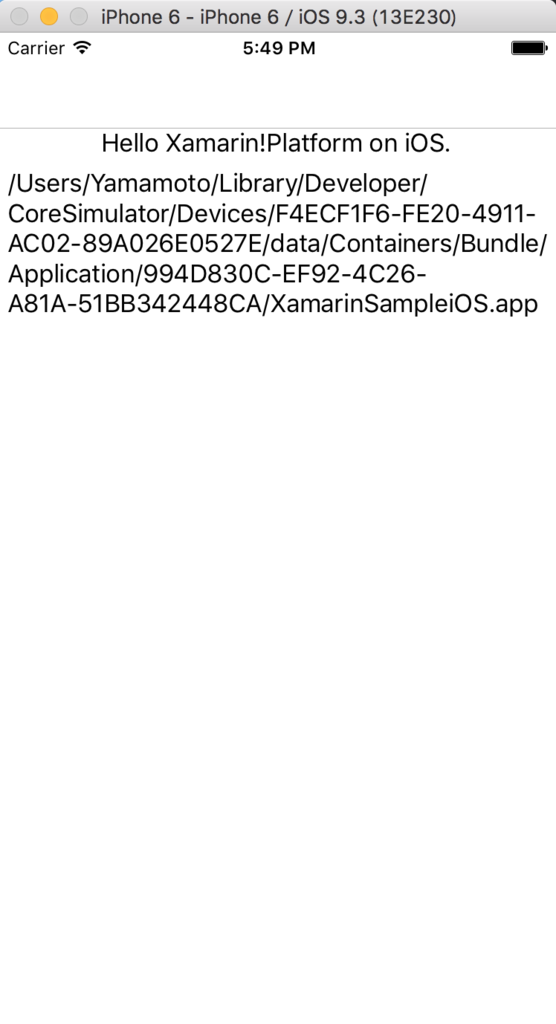
iOS
Android
エミュレータ永眠
UWP
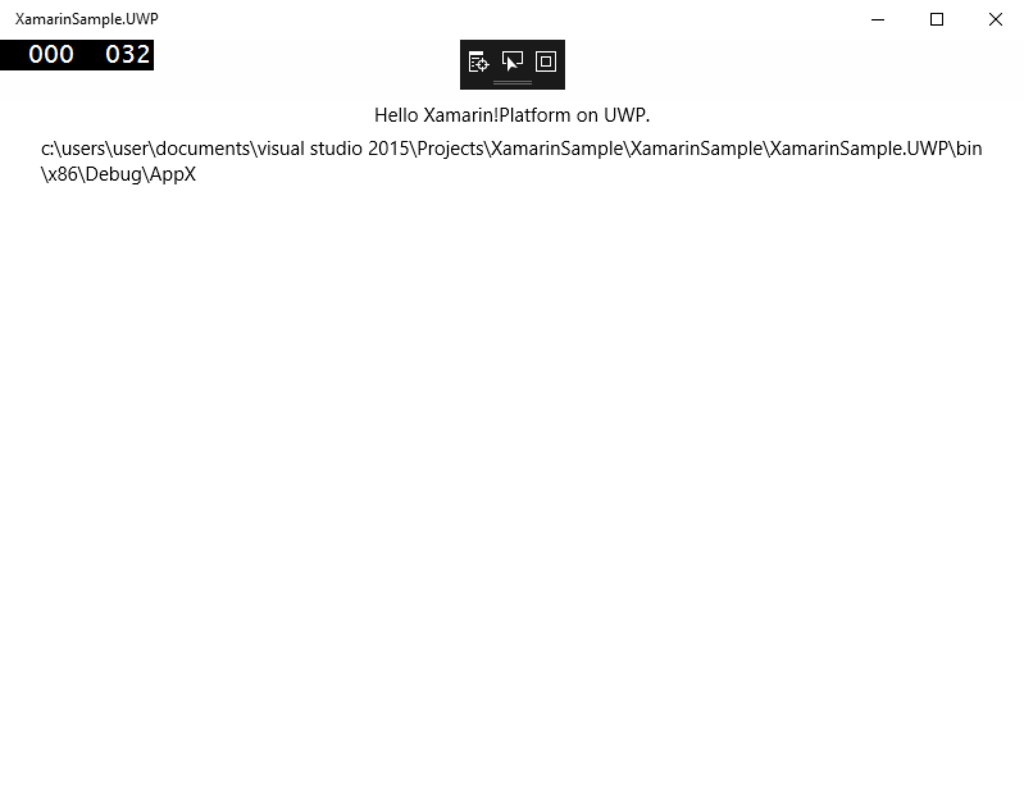
無事に注入されています。これでいちいちDependencyService.Get
注意点
リフレクションはめちゃくちゃ遅くなります。それを大量に使用しています。
あとは察してあげてください・・・
さらに深みへ
これでフィールドとプロパティにDependencyServiceを注入することができました。しかしPrismではコンストラクタのパラメータで注入しています。
もしかするとDependencyServiceを使うのは一度だけでよくインスタンスを確保しておく必要はない場合もあるかもしれません。
しかし、属性を使う都合上呼び出し側でゴニョゴニョする必要がありますが、XAMLでやる場合コンストラクタは引数なしを強要されます(リフレクションでやってるから?)。
ではどうするかというと、要するに描画に間に合うように注入できればいいのだからBehaviorを使ってViewModel側のメソッドを呼び出し、注入させます。
ソースコード
using System;
using System.Linq;
using System.Reflection;
using Xamarin.Forms;

namespace XamarinSample
{
    public class DependencyInjectionBehavior : Behavior<Page>
    {
        public static readonly BindableProperty TargetProperty
            = BindableProperty.Create(nameof(Target), typeof(object), typeof(DependencyInjectionBehavior),
                default(object));

        /// <summary>
        /// メソッドを呼び出すViewModel
        /// </summary>
        public object Target
        {
            get { return (object) GetValue(TargetProperty); }
            set { SetValue(TargetProperty, value); }
        }

        public static readonly BindableProperty MethodNameProperty
            = BindableProperty.Create(nameof(MethodName), typeof(string), typeof(DependencyInjectionBehavior), null);

        /// <summary>
        /// 呼び出すメソッドの名前
        /// </summary>
        public string MethodName
        {
            get { return (string) GetValue(MethodNameProperty); }
            set { SetValue(MethodNameProperty, value); }
        }

        protected override void OnAttachedTo(Page bindable)
        {
            base.OnAttachedTo(bindable);
            BindingContext = bindable.BindingContext;
            bindable.BindingContextChanged += OnBindingContextChanged;
            Initialize();
        }

        private void Initialize()
        {
            var dependency = typeof(DependencyService).GetRuntimeMethod("Get",
                new Type[] {typeof(DependencyFetchTarget)});

            //MethodNameと同じ名前のメソッドをTargetから取得
            var methodinfo = Target.GetType().GetRuntimeMethods()
                .FirstOrDefault(x => x.Name == this.MethodName);

            //パラメータ情報取得
            var paraminfo = methodinfo.GetParameters();

            //パラメータ情報からTypeを取得し、それでDependencyService.Get<T>()を実行
            var parameters = paraminfo
                .Where(x => x.GetCustomAttribute<AutoWiredAttribute>()!=null)
                .Select(x => dependency.MakeGenericMethod(x.ParameterType)
                    .Invoke(typeof(DependencyService),new object[] {DependencyFetchTarget.GlobalInstance})).ToArray();

            //メソッド起爆
            methodinfo.Invoke(Target, parameters);
        }

        private void OnBindingContextChanged(object sender, System.EventArgs e)
        {
            BindingContext = ((BindableObject) sender).BindingContext;

            Initialize();
        }
    }
}
要するにバインドしたTargetオブジェクトからリフレクションでMethodNameと同じメソッドを見つけ、そのパラメータをリフレクションで取得し、取得したパラメータタイプからリフレクションでDependencyService.Get
問題点としてこの仕組だと呼び出しメソッドをオーバーロードした場合意図した動作をしない可能性があることと、AutoWiredを付け忘れると即死することですがまあ些細な問題でしょう(棒)
namespace XamarinSample
{
    public class SampleViewModel
    {
        public string Text { get; private set; }

        public string Path { get; set; }

        public SampleViewModel()
        {
        }

        public void Initialize([AutoWired]ISample sample=null,[AutoWired]ISample2 sample2=null)
        {
            Text = sample.Get("Hello!!\n");
            Path = sample2.GetPath();
        }
    }
}
  <ContentPage.Behaviors>
    <xamarinSample:DependencyInjectionBehavior Target="{Binding}"
                                               MethodName="Initialize"/>
  </ContentPage.Behaviors>
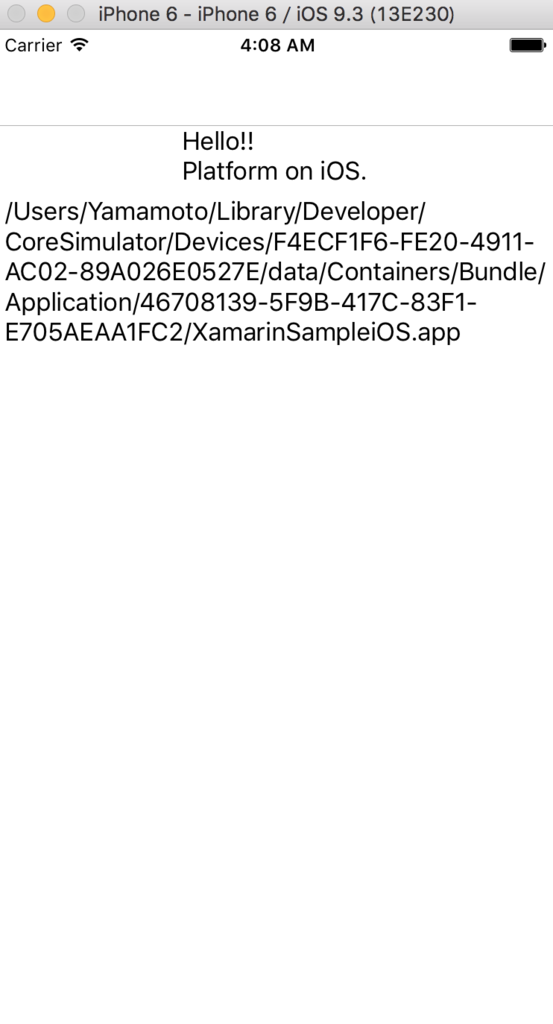
ViewModelはInitializeメソッドの中に初期化処理を入れただけ、Viewは上の行を追加しただけです。
実行
iOS
UWP
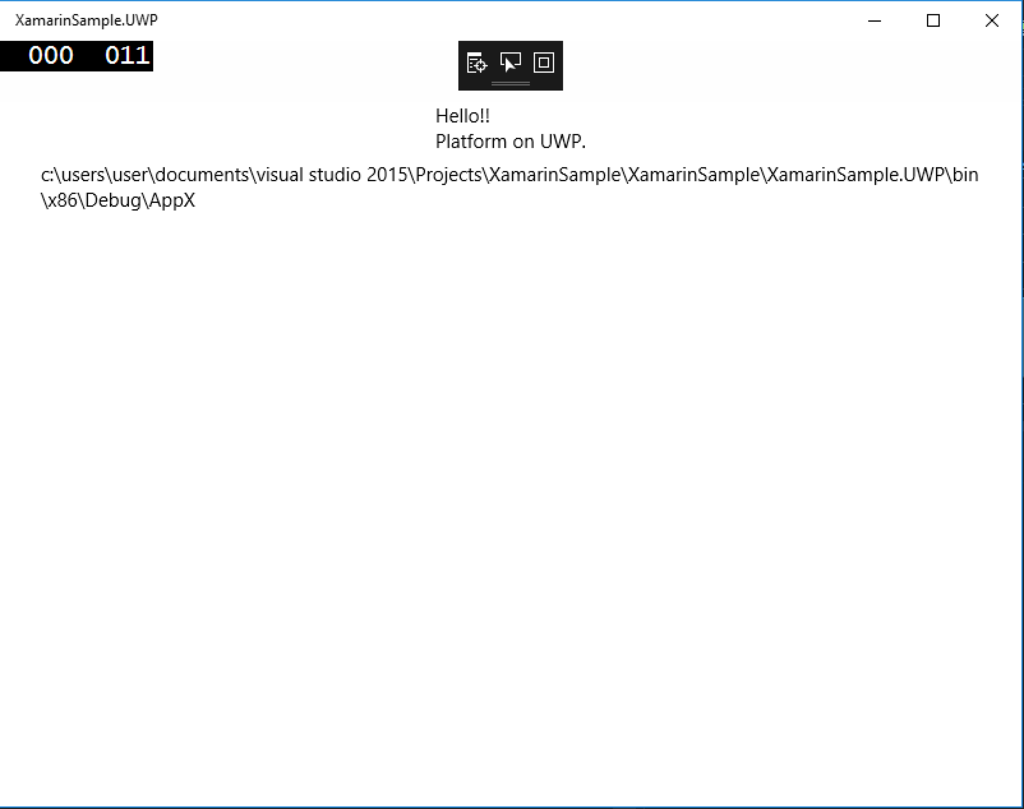
無事に表示されました。
感想
こういった機能は書いてるうちはめっちゃ楽しいです、ハイ。
まあ何かの参考程度に・・・
参考
Realm Xamarin メモ[Xamarin.Forms]
RealmのXamarin版が5/10に出ました。今回はそれを弄ってみたのでメモ等をつらつらと書いていきます。
Realmとは
詳しいことは
を見てみてください。
シンプル!!早い!!クロスプラットフォーム!!先進的!!など魅力的な言葉が踊っています。これはぜひ試すしかないでしょう。
なおUWP(とMac)は今のところ非対応ですが将来的に対応したいとのことなので近いうちにサポートされるでしょう(願望)。(realm-dotnetのIssueには既にUWPサポートの声がたくさん)
Realm Browser
Realmのデータベースのデータがどうなってるか知りたいとき、MacユーザにはRealm Browserという便利なものが用意されています。
Realm Browser
ScreenShotの言語は英語なのに入力が日本語なのめっちゃ気になる
使い方は簡単でRealmファイルをダブルクリックして出てきたウインドウのAllowボタンを押すだけです。データが可視化されてしかも編集もできるので大変便利です。
(iOS SimulatorでRealmファイルの場所がわからない場合は
swift - Realm Browserの使い方 - スタック・オーバーフロー
をみれば大丈夫かも)
ただ、上のリンクのバージョンだと一度開くとRealm Xamarinで開けなくなります。(2016/5/17現在) なのでRealm Xamarinで使いたい人はGithubから直接ダウンロードしてきましょう。
インストール
さっそく使っていきましょう。 準備はとても簡単でVSの場合ソリューションを右クリック->Manage Nuget Packages for Solution...でRealmを検索してプロジェクト全てにチェックをした状態でインストールするだけ。とても簡単です。(Versionは0.74.1)
さあ、早速iOSでビルドしてみると・・・
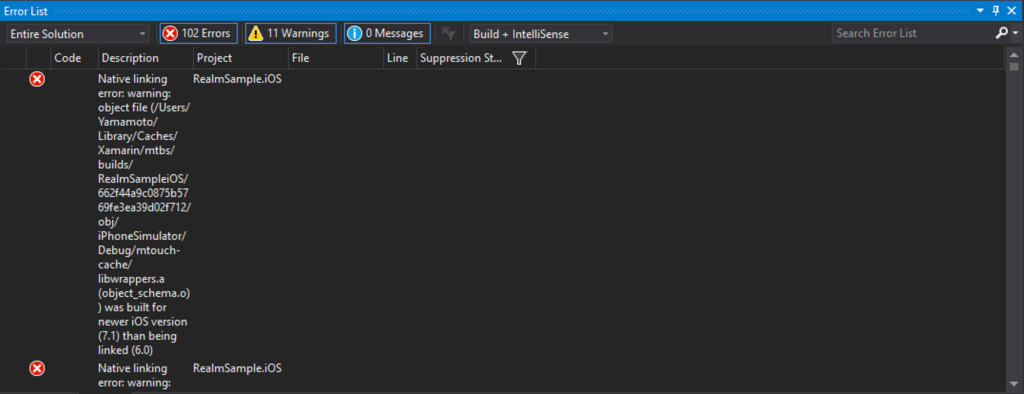
失敗しましたorz
原因
どうやらRealmはiOS7以上が必要な模様。VSのXamarin PCLで作るとiOSのデフォルトターゲットは6なので7以上に上げる必要があるみたいです。 なのでiOSの場合はiOSのプロジェクトを右クリック->Properties->iOS ApplicationのDeployment Targetを適宜変更しましょう。
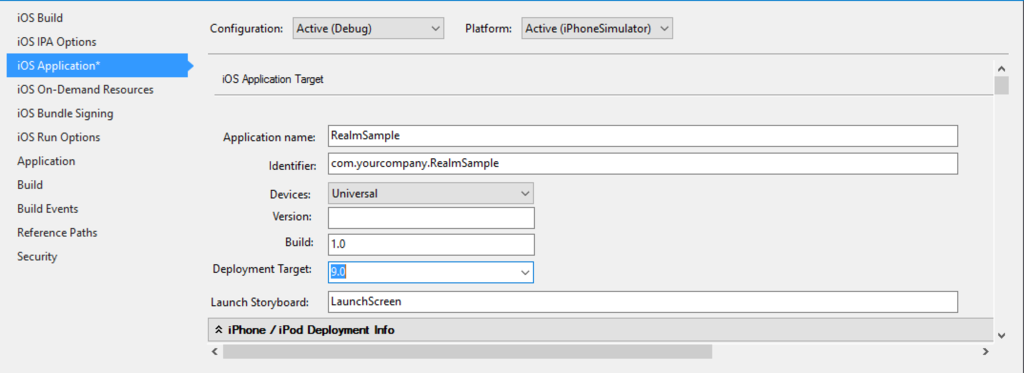
Androidも変える必要があるかもしれませんが残念ながらAndroidエミュレータは永眠中なので確かめられません。
もう一度ビルドしてみると成功しました!
使ってみる
それでは早速使っていきましょう。
Realmを使うのに各プロジェクトにそれぞれPath等を書く必要はありません。デフォルトでは'Environment.SpecialFolder.Personalに作られるみたいです(ファイル名はdefault.realm)。名前を変更したい場合はRealm.GetInstance(optionalPath)`のoptionalPathに好きな名前を入れましょう。
今回はお試しなので適当にテーブル作ってデータ突っ込んで取得して画面に表示させます。
public App()
{
            //Realmインスタンス取得
            var realm = Realm.GetInstance();

            //書き込み開始
            using (var transaction = realm.BeginWrite())
            {
                var sample = realm.CreateObject<Human>();
                sample.Age = 18;
                sample.Name = "Hoge hoge";

                transaction.Commit();
            }

            //テーブルの一番最初のデータ取得
            var human = realm.All<Human>().ToList().FirstOrDefault();

            var content = new ContentPage
            {
                Title = "RealmSample",
                Content = new StackLayout
                {
                    VerticalOptions = LayoutOptions.Center,
                    Children = {
                        new Label {
                            HorizontalTextAlignment = TextAlignment.Center,
                            Text = $"名前:{human.Name}\n年齢:{human.Age}才",
                        }
                    }
                }
            };

            MainPage = new NavigationPage(content);
}

public class Human : RealmObject
{
            public int Age { get; set; }
            public string Name { get; set; }
}
実行してみると・・・
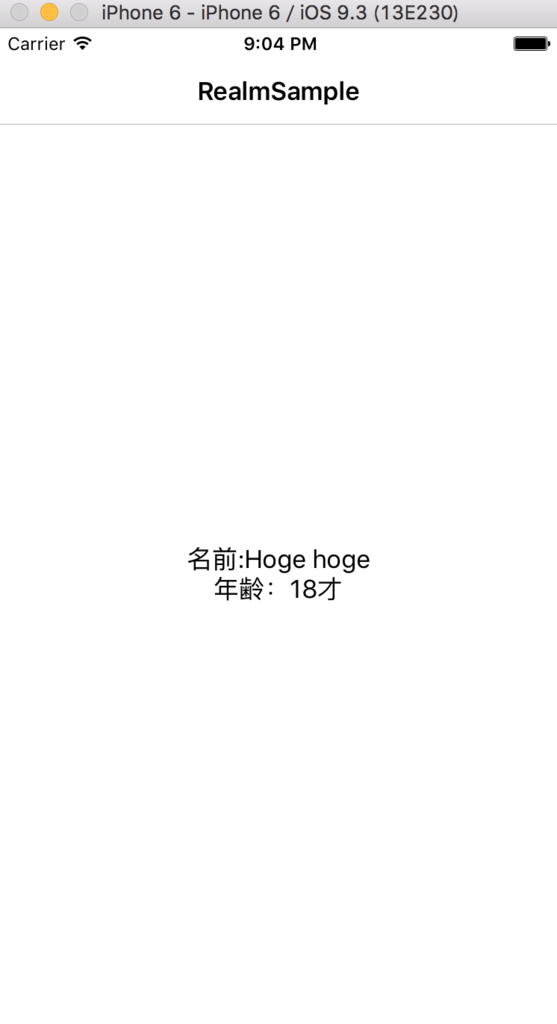
無事に追加されています。やったね!
realm.All<Human>()で直接FirstOrDefault()しない理由はまだサポートされてないのでToListを挟まないと使えないからです。ただ、PullRequestも飛んでたし次のバージョンくらいにはサポートされるんじゃないかなーと期待してます。
なお現時点でもFirstメソッドは使えます。
注意点
実際に使ってみてハマったところや気になったところ
使えるデータ
Realmがサポートしているのは
- bool
- char
- byte
- short
- int
- long
- float
- double
- string
- DateTimeOffset
です。プリミティブ型はNullableもサポートしています。また、RealmObjectとRealmListも設定可能です。
Linqサポート
上にも書きましたが、まだLinqの全てのメソッドをサポートしたわけでは無いみたいです。私が知っているのはFirstOrDefaultとSingleOrDefault、Take、Where系の中でRealmObjectのプロパティ同士の比較(.Where(x=>x.Name==otherX.Name))とか。.Where(x=>x.Name=="Hoge")は大丈夫)です。(他にもありそう)
Transaction外でプロパティセット
上の例でもそうですが、using(var tansaction=realm.BeginWrite())の外でRealmオブジェクトを通して取得したRealmObjectオブジェクトのプロパティのセッターを呼ぶと死にます。
なのでMVVMパターンでうっかりViewModelのプロパティにRealmObjectを紐付けて双方向バインディングで更新をしようとしたら例外で即死します。
ObjectId
特筆すべきことではないっぽいのですが、主キーを設定したいときはObjectId属性をつけるとそうなります。 個人的にそういうのはPrimaryKeyって感じなので最初戸惑ったのですが他でもそう呼ばれているらしい?
ViewModelから画面遷移する[Xamarin.Forms]
様の投稿を見て思いつきました。ネタというか個人的に好きな方法で実用性はわかりません。
MVVMでViewModelからViewへの操作は難しいです。理由は上記投稿を見ていただければ大丈夫なので説明はしません。
ただ、個人的にViewへのコードビハインドは何も書きたくない(願望)ですし、なんとなくViewModelからViewを生成したくない、画面遷移だけでライブラリをいれたくないという超わがままな理由から第5の方法を紹介します。
それは
Messengerを自作する
です。
いやいやMessagingCenterがあるじゃん!!思うかもしれませんがMessagingCenterはstaticであり思わぬところで誤爆する可能性があ・・・りますかね? あとどうせなら自分で作ってカスタマイズしたいですよねそうですよね!!
では実際に作っていきましょう。
Messenger
今回は簡単なMessengerを作ります。
作り方は
を参考にしています。というかほとんど同じです。この記事はWPFの解説記事ですし書かれた時期はXamarin社ができたのとほぼ同じですがC#の基本的な機能を使っているのでView部分以外はそのまま使えます。素晴らしい!!
Message.cs
MessengerのMessage部分です。ここにViewへのメッセージを詰め込みます。今回はResponseを受け取る予定はないのでデフォルト引数でnullを指定しています。
using System;

namespace MessengerSample
{
    public class Message
    {
        //メッセージ本体
        public object Body { get;}

        //レスポンス(今回は未使用)
        public object Response { get; }

        public Message(object body, object response=null)
        {
            this.Body=body;
            Response = response;
        }
    }
}
MessageEventArgs.cs
Messengerのイベントのイベント引数です。今回は特にコールバックを以下略
using System;

namespace MessengerSample
{
    public class MessageEventArgs:EventArgs
    {
        public Message Message { get; }

        public Action<Message> Callback { get;}


        public MessageEventArgs(Message message, Action<Message> callback=null)
        {
            this.Message = message;
            this.Callback = callback;
        }
    }
}
Messenger.cs
Messageを発行するクラスです。今回は特にコールバックを(ry
using System;

namespace MessengerSample
{
    public class Messenger
    {
                //Messageが送信されたことを通知するイベント
        public event EventHandler<MessageEventArgs> Raised;

      //Messageを送信する
        public void Raise(Message message, Action<Message> callback=null)
        {
            this.Raised?.Invoke(this,new MessageEventArgs(message,callback));
        }
    }
}
ViewModelBase.cs
これでMessengerの用意ができたのでこれを使っていくクラスを作っていきます。
using System.ComponentModel;
using System.Runtime.CompilerServices;
using MessengerSample.Annotations;

namespace MessengerSample
{
    public class ViewModelBase:INotifyPropertyChanged
    {
        public Messenger Messenger { get; }=new Messenger();

        public event PropertyChangedEventHandler PropertyChanged;

        [NotifyPropertyChangedInvocator]
        protected virtual void OnPropertyChanged([CallerMemberName] string propertyName = null)
        {
            PropertyChanged?.Invoke(this, new PropertyChangedEventArgs(propertyName));
        }
    }
}
このViewModelBaseを継承することでMessengerを使ってViewに通知をだすことができます。 あとなぜかINotifyPropertyChangedを継承していますが特に必要ありません。
MessageTriggerBehavior.cs
次にMessageを受信します。上でも述べたとおりViewのコードビハインドに書くのは避けたいのでBehaviorを使います。
using System;
using Xamarin.Forms;

namespace MessengerSample
{
    public class MessageTriggerBehavior : Behavior<Page>
    {
        private Page _page;

        public static readonly BindableProperty MessengerProperty =
            BindableProperty.Create(nameof(Messenger), typeof (Messenger), typeof (MessageTriggerBehavior), default(Messenger));

                //ViewModelのMessenger
        public Messenger Messenger
        {
            get { return (Messenger) GetValue(MessengerProperty); }
            set { SetValue(MessengerProperty, value); }
        }


        public static readonly BindableProperty MessageKeyProperty =
            BindableProperty.Create(nameof(MessageKey), typeof (string), typeof (MessageTriggerBehavior), default(string));

                //このMessageKeyと一致したとき遷移させる
        public string MessageKey
        {
            get { return (string) GetValue(MessageKeyProperty); }
            set { SetValue(MessageKeyProperty, value); }
        }


        public static readonly BindableProperty PageTypeProperty =
            BindableProperty.Create(nameof(PageType), typeof (Type), typeof (MessageTriggerBehavior), default(Type));

      //遷移先ページのタイプ
        public Type PageType { get { return (Type) GetValue(PageTypeProperty); } set { SetValue(PageTypeProperty, value); } }


        protected override void OnAttachedTo(Page bindable)
        {
            base.OnAttachedTo(bindable);

            _page = bindable;
            //これしないとBehaviorのプロパティに値がバインドされない
            this.BindingContext = bindable.BindingContext;

       //Messengerに登録
            Messenger.Raised += Invoke;
        }

                protected override void OnDetachingFrom(Page bindable)
        {

            Messenger.Raised -= Invoke;
            this.BindingContext = null;

            base.OnDetachingFrom(bindable);
        }


                private void Invoke(object sender, MessageEventArgs args)
        {
            var message = args.Message.Body as string;
            //MessageKeyと送られてきたMessage.Bodyがあっていなければ何もしない
            if (message == null || MessageKey != message) return;

       //PageTypeからPageインスタンス作成
            var page = Activator.CreateInstance(PageType) as Page;

       //遷移
            _page.Navigation.PushAsync(page);
        }
    }
}
MessengerにはViewModelBaseのMessengerをバインドし、MessengerKeyにはMessengerのイベントハンドラに登録したMessage.Bodyと同じ文字列を指定します。
MessageKeyと同じMessage.Bodyを受信するとPageTypeからインスタンスを生成し、Navigation.PushAsyncする単純な仕組みです。
これで準備が終わりました。長い
使ってみる
Content1.xaml
<ContentPage xmlns="http://xamarin.com/schemas/2014/forms"
             xmlns:x="http://schemas.microsoft.com/winfx/2009/xaml"
             xmlns:messengerSample="clr-namespace:MessengerSample;assembly=MessengerSample"
             x:Class="MessengerSample.Content1">
    <ContentPage.BindingContext>
        <messengerSample:ContentViewModel />
    </ContentPage.BindingContext>

    <ContentPage.Behaviors>
        <messengerSample:MessageTriggerBehavior Messenger="{Binding Messenger}"
                                                MessageKey="Show:Content2"
                                                PageType="{x:Type messengerSample:Content2}" />
    </ContentPage.Behaviors>

    <StackLayout HorizontalOptions="Center" VerticalOptions="Center">
        <Label Text="Content1" FontSize="Large" />
        <Button Text="Navigate Content2" Command="{Binding NavigationContent2}" />
    </StackLayout>
</ContentPage>
Content2.xaml
<ContentPage xmlns="http://xamarin.com/schemas/2014/forms"
             xmlns:x="http://schemas.microsoft.com/winfx/2009/xaml"
             xmlns:messengerSample="clr-namespace:MessengerSample;assembly=MessengerSample"
             x:Class="MessengerSample.Content2">
    <ContentPage.BindingContext>
        <messengerSample:ContentViewModel />
    </ContentPage.BindingContext>

    <ContentPage.Behaviors>
        <messengerSample:MessageTriggerBehavior Messenger="{Binding Messenger}"
                                                MessageKey="Show:Content1"
                                                PageType="{x:Type messengerSample:Content1}" />
    </ContentPage.Behaviors>

    <StackLayout HorizontalOptions="Center" VerticalOptions="Center">
        <Label Text="Content2" FontSize="Large" TextColor="Green" />
        <Button Text="Navigation Content1" Command="{Binding NavigationContent1}" />
    </StackLayout>
</ContentPage>
ContentViewModel.cs
using System;
using Reactive.Bindings;

namespace MessengerSample
{
    public class ContentViewModel : ViewModelBase
    {
                //Content1に遷移するコマンド
        public ReactiveCommand NavigationContent1 { get; } = new ReactiveCommand();

      //Content2に遷移するコマンド
        public ReactiveCommand NavigationContent2 { get; } = new ReactiveCommand();

        public ContentViewModel()
        {
            NavigationContent1.Subscribe(_ => Messenger.Raise(new Message("Show:Content1")));

            NavigationContent2.Subscribe(_ => Messenger.Raise(new Message("Show:Content2")));
        }
    }
}
Content1のボタンをクリックするとCommandが実行しViewに向けてメッセージが飛びます。それをBehaviorで受け止めてリフレクションでContent2のインスタンスを作成し遷移させます。
今回はわざわざICommandを継承したクラスを作成して〜をするのがめんどくさかったので ReactiveProperty でコマンドを生成しています。
これを実行すると・・・
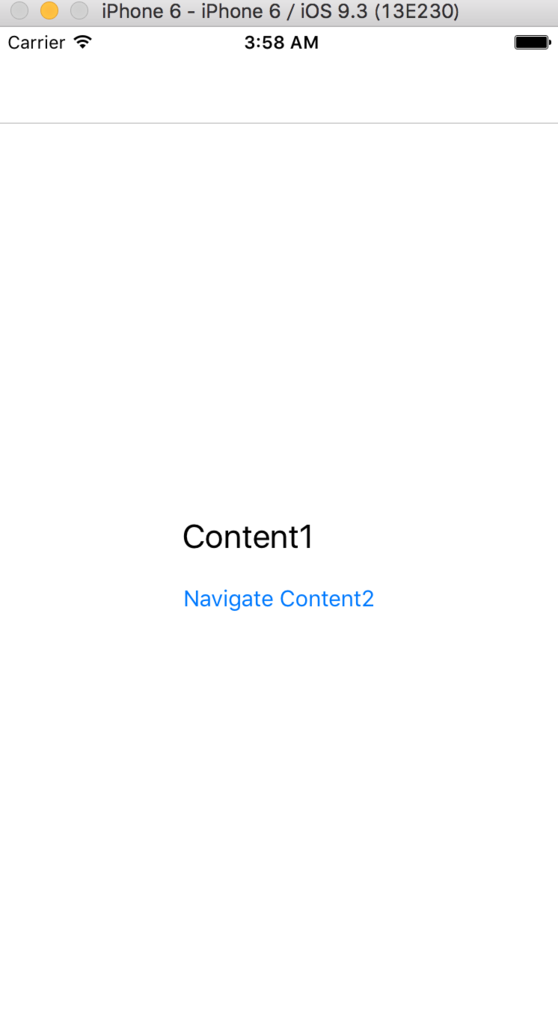
Navigation Content2を押せば
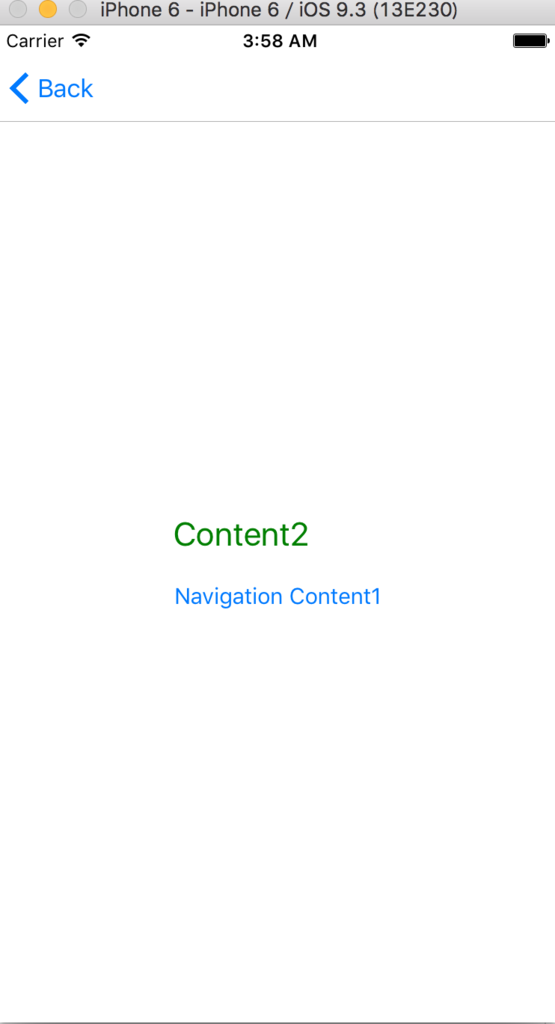
無事遷移できました!! ちなみにサンプルがiOSだけなのはAndroidのシュミレータはなぜか起動しないし(実機持ってない)、UWPは’アプリは開始されませんでした’エラーでいつもどおり実行できなかったので実行できたのがiOSだけだからです。
画面遷移時のデータ引き渡しについて
画面遷移時のデータ引き渡しにはMessageを拡張し、そこに遷移先のViewModelのインスタンスを突っ込んでRaiseしMessageTriggerBehaviorでごにょごにょすれば大丈夫だと思います。
まとめ
ライブラリでいいんじゃね?
この方法でも実際に画面遷移ができました。この方法の利点は自分で好きな機能を継ぎ足せることにあると思います。
また余計な機能がないのでとてもシンプルです。他の利点は・・・特に思いつきません。。
参考
Xamarin.Forms ページ遷移時のデータ受け渡しについて - Qiita
Xamarin.Forms に CallMethodAction が無かったので Behavior で代用してみた - Qiita
OxyPlotでグラフを表示する(WPF)
WPFでグラフを表示するライブラリを探してたとき、Oxyplotを使っている人が多かった(気がした)ので使ってみたメモ。
Webに転がってるサンプルはC#で書かれたものが多いけどせっかく高性能なXAMLが使えるのに使わないのはもったいない!ということでグラフの見た目はなるべくXAMLで書いていきます
開発環境はWIndows10+VisualStudio2015 Community+.NetFramework4.6です。
OxyPlotとは
OXYPlotは様々なグラフの作成を容易にするMIT Licenseのライブラリです。
さまざまなプラットフォームに対応しており
- WPF
- Windows8
- Windows Phone
- Windows Phone Silverlight
- Windows Forms
- Silverlight
- GTK#
- Xwt
- Xamarin.iOS
- Xamarin.Android
- Xamarin.Forms
- Xamarin.Mac
に対応しているらしいです。
ただ、現時点(2016年2月)では プレリリース になっています。
サンプルプロジェクト作成
実際にプロジェクトを作成します。
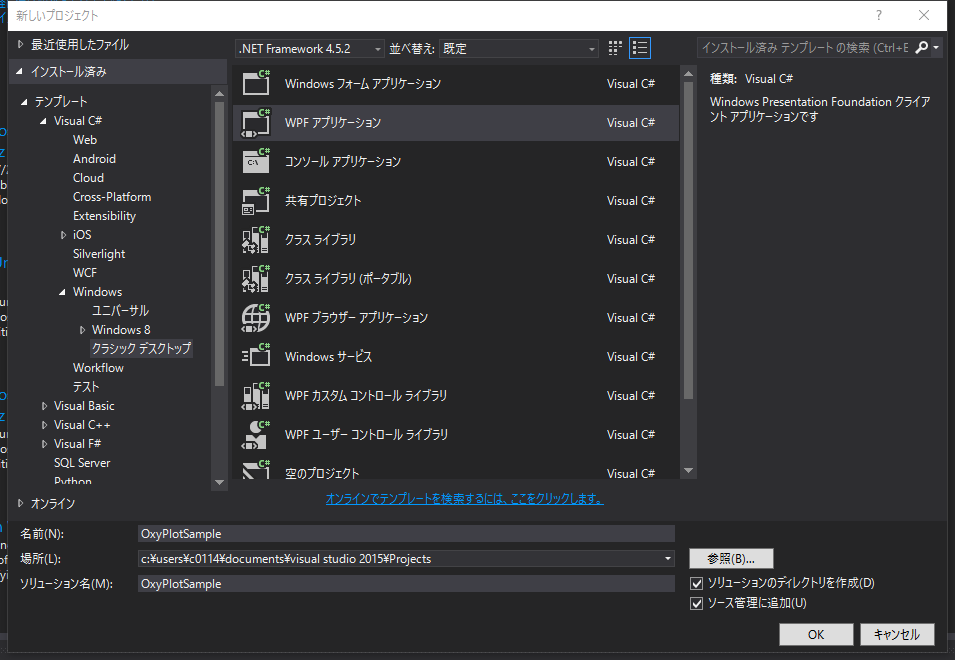
今回はWPFアプリケーションで作成し、プロジェクト名は「OxyPlotSample」にしました。
Nugetでインストール
NugetからOxyPlotをインストールします。
このとき、「プレリリースを含める」にチェックが入ってないと表示されません。
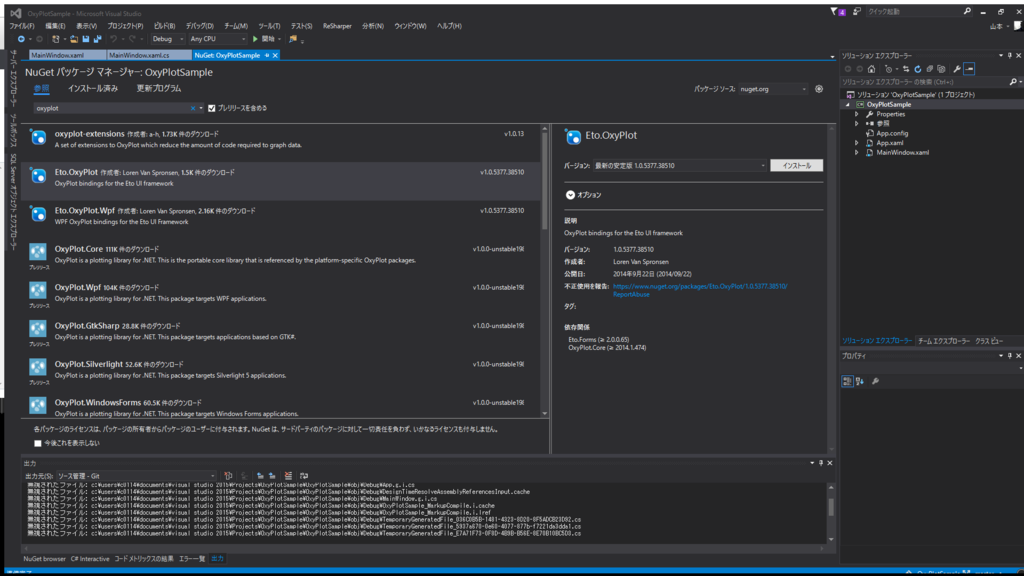
上のほうになにやらいろいろありますが今回は使わないのでスルーして「OxyPlot.Wpf」をインストールします。
ちなみに私がインストールしたときのバージョンは1.0.0-unstable1983でした。
unstableの文字が怖いのですが安心してください。Nugetにあるやつ全てunstableです。
グラフに表示するデータ作成
無事OxyPlotがインストールできたのでグラフを作成していきたいのですが、その前にグラフ用のデータを作成します。
クラスを追加し、名前を「MainWindowViewModel」にします。一応WPFなのでViewModelと名前がついてますが今回はサンプルなので名前だけです。
中身は以下のようにしました。
using System.Collections.Generic;
using OxyPlot;

namespace OxyPlotSample
{
    public class MainWindowViewModel
    {
        public MainWindowViewModel()
        {
            DataList = new List<DataPoint>
            {
                {new DataPoint(0, 0)},
                {new DataPoint(2, 4)},
                {new DataPoint(5, 8)},
                {new DataPoint(8, 3)},
                {new DataPoint(12, 5)},
            };
        }

        public List<DataPoint> DataList { get; }
    }
}
DataPointのコレクションをグラフのItemSourceにバインドしてあげることでグラフが描かれます。
グラフ作成
データもできたので実際にグラフを作成していきます。 今回はもともとあるMainWindow.xamlに直接書いていきます。
<Window x:Class="OxyPlotSample.MainWindow"
        xmlns="http://schemas.microsoft.com/winfx/2006/xaml/presentation"
        xmlns:x="http://schemas.microsoft.com/winfx/2006/xaml"
        xmlns:d="http://schemas.microsoft.com/expression/blend/2008"
        xmlns:mc="http://schemas.openxmlformats.org/markup-compatibility/2006"
        xmlns:local="clr-namespace:OxyPlotSample"
        xmlns:oxy="http://oxyplot.org/wpf"
        mc:Ignorable="d"
        Title="MainWindow" >
    <Window.DataContext>
        <local:MainWindowViewModel />
    </Window.DataContext>
    <Grid>
        <oxy:Plot>
            <oxy:Plot.Series >
                <oxy:LineSeries ItemsSource="{Binding DataList}" />
            </oxy:Plot.Series>
        </oxy:Plot>
    </Grid>
</Window>
基本的にOxyPlotでグラフを描画するときはPlotで作っていきます。
そのなかのSeriesプロパティがグラフの要素(今回は線)を描画する部分です。
ここまで書いてからビルドすると・・・

XAMLのデザイナーでもItemSourceの値通りに描画してくれました!これはありがたい。 実際にデバッグで実行してみても
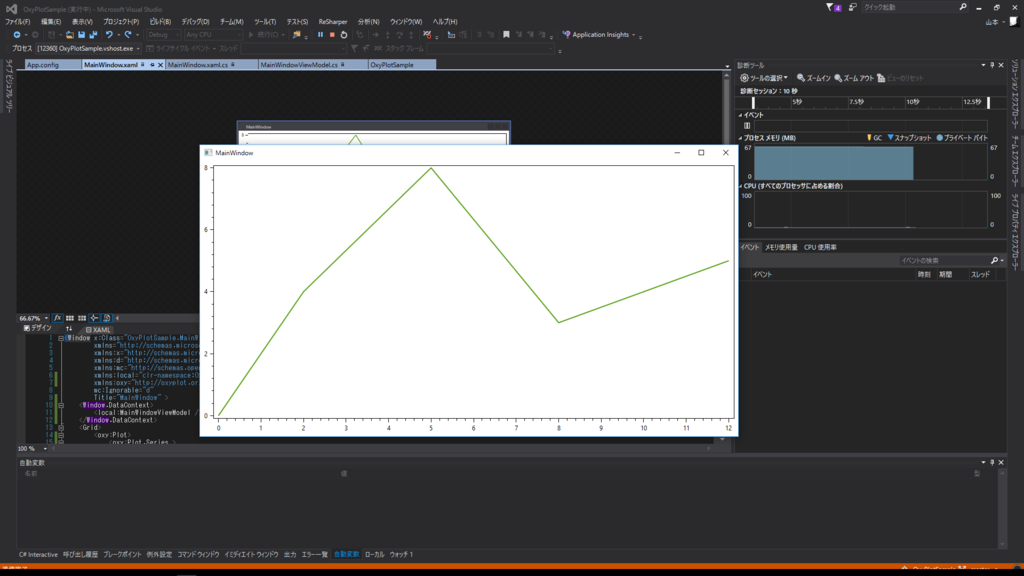
ちゃんとグラフが描画されてますね!
しかしこのままではなんか殺風景というかせっかく高機能なWPFを使っているのにこれでは面白くありません。 というわけでこれをもとに改造していきます。
背景変更
まず背景の白がなんか安っぽさを出していますよね。黒のほうがかっこいいですよね! というわけで黒にしましょう!
背景を黒にするのは簡単です。PlotのBackgroundプロパティに変更したい色を指定するだけです。
今回は真っ黒なのもなんかあれなので#FF1A1A1Aくらいにしました。
これで実行すると・・・
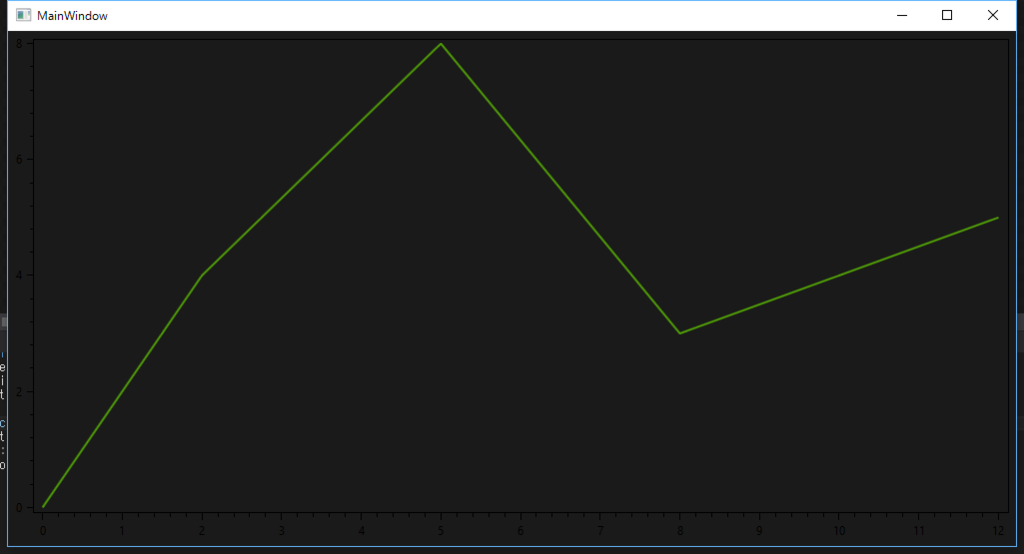
軸がとても見えにくくなりました(当たり前)
軸変更
なので次は軸を変更していきます。
軸はPlotのAxesに軸クラスを追加していきます。
<oxy:Plot.Axes>
                <oxy:LinearAxis Position="Left" AxislineColor="Gray"
                                MajorGridlineStyle="Solid" MajorGridlineColor="Gray"
                                MinorGridlineStyle="Dot" MinorGridlineColor="Gray"
                                TicklineColor="Gray" TextColor="Gray" />
</oxy:Plot.Axes>
まずPlot.AxesにLinearAxisを追加します。これは普通の線状の軸です。
まずPositionでどこの軸なのかを明確にします。次にAxislineColorで軸の色を追加します。
MajorGridlineとMinorGridlineは補助線ですね(正式名称知らない)
それぞれのGridlineStyleは線の種類を指定します。Solidは線でDotは点でまんまです。GridlineColorで色を指定します。
TicklineColorは軸の目盛りの色を指定します。TextColorは目盛りの数字の色です。
今回は背景が黒なので軸は灰色で統一しました。
実行結果は・・・
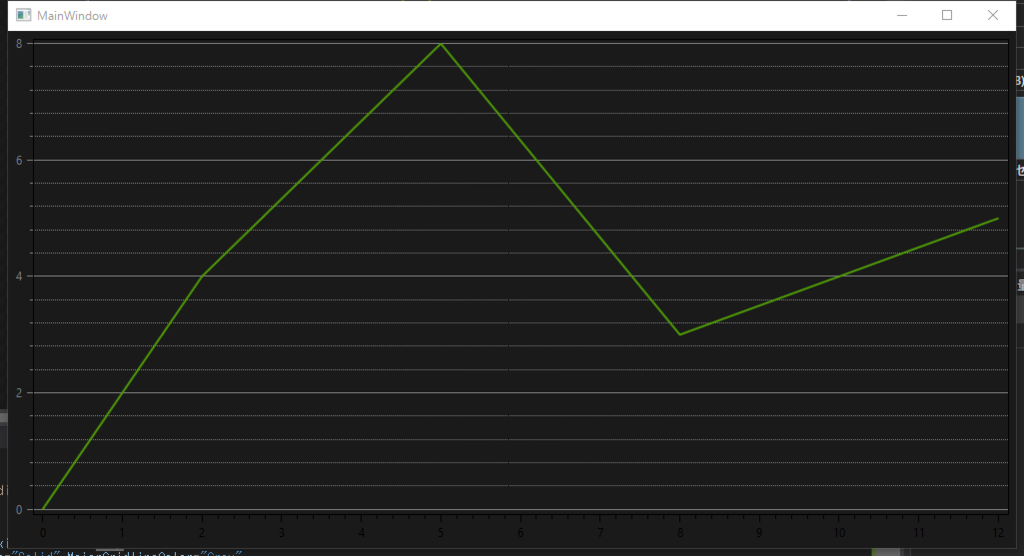
うまくいっているふうに見えますが左軸の色が反映されていません。
ここは結構ハマりました。もっといい解決法があるかもしれませんが、PlotプロパティのPlotAreaBorderColorをTransparentに、
AxislineStyleをSolidに変更したら・・・
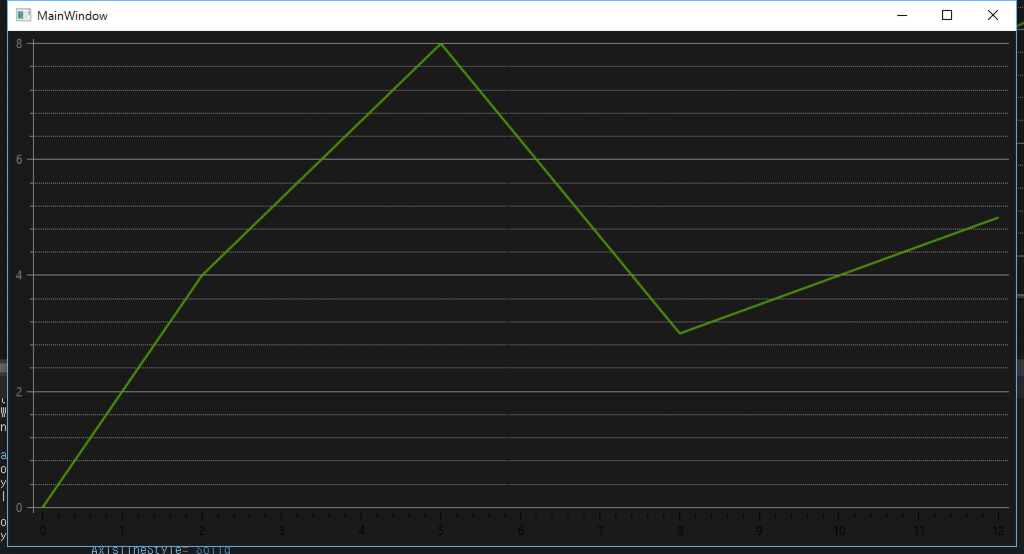 ちゃんと色がついてくれました!!
どうやらAxislineStyleは最初はNone?だったらしく描画そのものがされていない様子。そしてPlotAreaBorderColorが軸の上に描画されているらしくそっちが優先されているみたいでした。まあ普通は消す必要ないと思いますが今回は軸がちゃんと反映されているか確かめるために消えてもらいました。
グラフの変更
軸を変更できたので次はグラフの線を色々変更していきます。 変更後はこうなりました。
<oxy:Plot.Series>
                <oxy:LineSeries ItemsSource="{Binding DataList}"
                                LineStyle="Dash" MarkerSize="5" MarkerType="Circle"
                                MarkerStroke="DarkGreen" MarkerStrokeThickness="2"
                                MarkerFill="GreenYellow" />
</oxy:Plot.Series>
あんまり変わっていませんがLineStyleで線の種類を設定します。
Marker関連はItemSourceのコレクションの各要素の値の部分にMarkerTypeで指定した印が入るようになります。
簡単に説明すると、Strokeで印の外枠の色を、StrokeThicknessで外枠の幅を、Fillで印の中の色を指定します。
これの実行結果はこうなります。
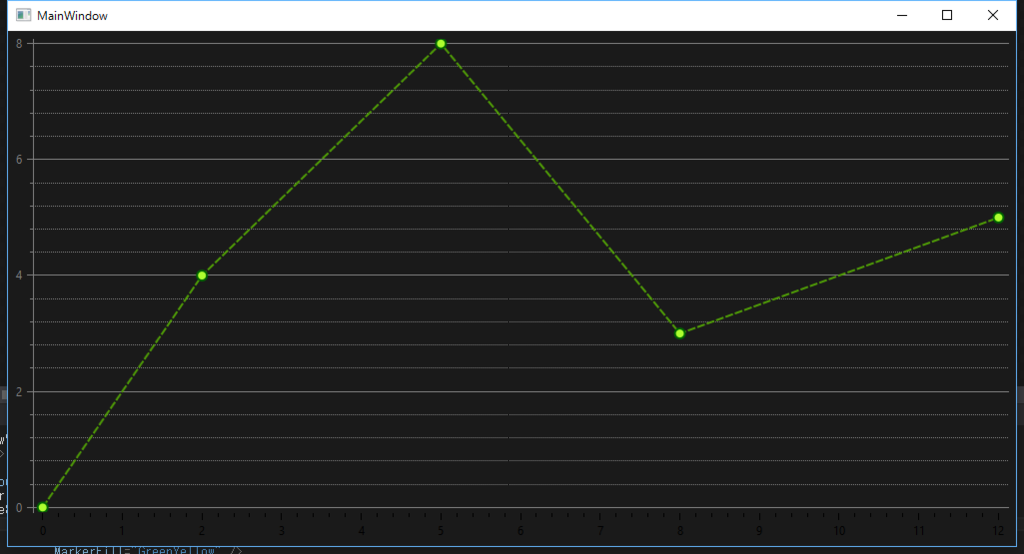
凡例作成
グラフの見た目が決まってきたので凡例を作成します。
<oxy:Plot Background="#FF1A1A1A" PlotAreaBorderColor="Transparent"
                  LegendBackground="#FF333333" LegendSymbolLength="30"
                  LegendTextColor="#FFCCCCCC"
                  LegendTitle="グラフの種類" LegendTitleColor="#FFAAAAAA">
凡例はPlotのLegend〜プロパティを指定していきます。 たぶんもう解説しなくてもなんとなく察せると思います。。。
実行結果はこちら
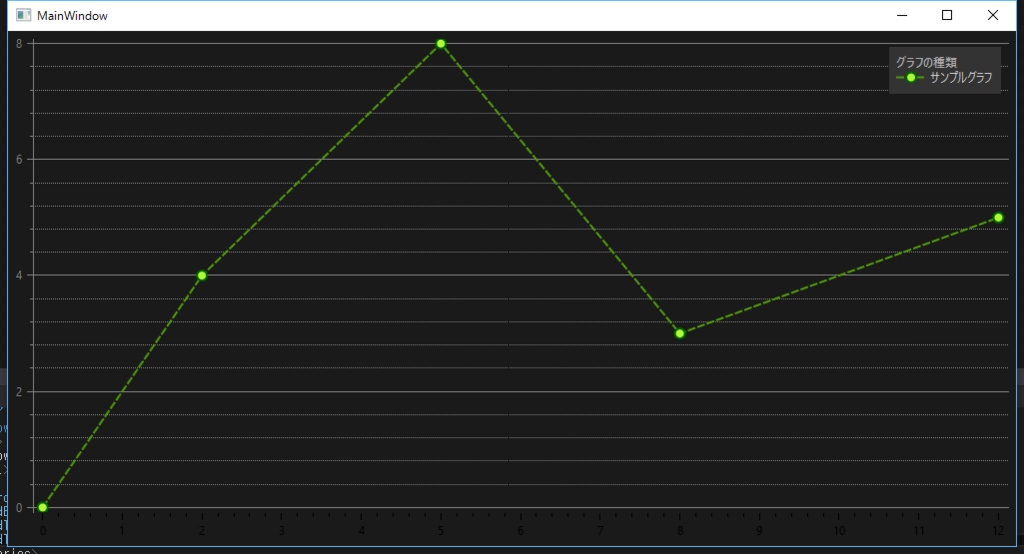
右上端っこにひっそりと凡例が追加されました。
以上が基本的なOxyPlotの使い方というか見た目の設定の仕方になります。
OxyPlotには他にも様々な機能があり、高性能なのですがなかなか解説を探すのに骨が折れます。
また、まだプレリリースなだけあり、結構仕様変更が入ってるぽい?です。(ネットで見つけたコードのプロパティが存在しなかったり)
しかし、比較的楽に、また自由にグラフが描けるのでグラフを描画する必要が出てきたときは使ってみてはいかがでしょうか?
そして、最終的にグラフはこうなりました。

MainWindowViewModel.cs
using System.Collections.Generic;
using OxyPlot;

namespace OxyPlotSample
{
    public class MainWindowViewModel
    {
        public MainWindowViewModel()
        {
            DataList = new List<DataPoint>
            {
                {new DataPoint(0, 0)},
                {new DataPoint(2, 4)},
                {new DataPoint(5, 8)},
                {new DataPoint(8, 3)},
                {new DataPoint(12, 5)},
            };

            DataList2=new List<DataPoint>
            {
                {new DataPoint(0,8) },
                {new DataPoint(2,4) },
                {new DataPoint(5,6) },
                {new DataPoint(7,12) },
                {new DataPoint(13,17) },
            };
        }

        public List<DataPoint> DataList { get; }

        public List<DataPoint> DataList2 { get;}
    }
}
MainWindow.xaml
<Window x:Class="OxyPlotSample.MainWindow"
        xmlns="http://schemas.microsoft.com/winfx/2006/xaml/presentation"
        xmlns:x="http://schemas.microsoft.com/winfx/2006/xaml"
        xmlns:d="http://schemas.microsoft.com/expression/blend/2008"
        xmlns:mc="http://schemas.openxmlformats.org/markup-compatibility/2006"
        xmlns:local="clr-namespace:OxyPlotSample"
        xmlns:oxy="http://oxyplot.org/wpf"
        mc:Ignorable="d"
        Title="MainWindow">
    <Window.DataContext>
        <local:MainWindowViewModel />
    </Window.DataContext>
    <Grid>
        <oxy:Plot Background="#FF1A1A1A" Padding="20"
                  PlotAreaBorderColor="Transparent"
                  LegendBackground="#66333333" LegendSymbolLength="30"
                  LegendTextColor="#CCCCCCCC"
                  LegendTitle="グラフの種類" LegendTitleColor="#CCAAAAAA"
                  Title="サンプルグラフ" TitleColor="Gray" TitlePadding="20"
                  Subtitle="OxyPlotのサンプルグラフです" TextColor="Gray">
            <oxy:Plot.Series>

                <oxy:AreaSeries ItemsSource="{Binding DataList2}" LineStyle="Solid" Color="Aqua"
                                MarkerType="Square" MarkerFill="Blue" MarkerStroke="DarkBlue"
                                Title="サンプルエリアグラフ" />

                <oxy:LinearBarSeries ItemsSource="{Binding DataList}"
                                     StrokeColor="OrangeRed" BarWidth="30" FillColor="DarkOrange" Title="サンプル棒グラフ" />

                <oxy:LineSeries ItemsSource="{Binding DataList}" BrokenLineStyle="LongDash"
                                LineStyle="Dash" MarkerSize="5" MarkerType="Circle"
                                MarkerStroke="DarkGreen" MarkerStrokeThickness="2"
                                MarkerFill="GreenYellow"
                                Title="サンプル線グラフ" />

            </oxy:Plot.Series>

            <oxy:Plot.Axes>
                <oxy:LinearAxis Position="Left" AxislineColor="Gray"
                                AxislineStyle="Solid"
                                MajorGridlineStyle="Solid" MajorGridlineColor="Gray"
                                MinorGridlineStyle="Dot" MinorGridlineColor="Gray"
                                TextColor="Gray" TickStyle="None"
                                StartPosition="-0.01" Maximum="20"
                                IntervalLength="150"
                                Title="X軸" TitleColor="Gray" />

                <oxy:LinearAxis Position="Bottom" AxislineColor="Gray" AxislineStyle="Solid"
                                MajorGridlineStyle="Solid" MajorGridlineColor="Gray"
                                MinorGridlineStyle="Dot" MinorGridlineColor="Gray"
                                TextColor="Gray" TickStyle="None" Maximum="15"
                                IntervalLength="200" StartPosition="-0.01"
                                Title="Y軸" TitleColor="Gray" />

            </oxy:Plot.Axes>
        </oxy:Plot>
    </Grid>
</Window>
AreaSeriesってどういうとき使うの?
以上です。